
Making a glass bong | Fifth Ave Green House
Glass blowing is a technique for making glass dating back to the 1st century BC. While the industrial age streamlined many handcrafted processes and resulted in more efficient output and consistent quality, the craft of glass blowing has remained largely the same to this day.
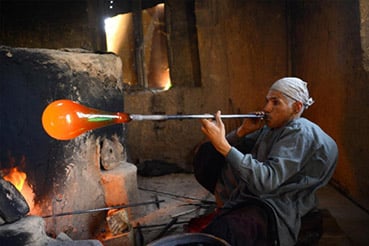
In this free-flight technique, the molten glass is collected on a hollow blowpipe.
Air is blown through the tube into the heated glass, creating a bubble or preform. The blowpipe would be quickly twisted and rolled in the hands to maintain symmetry in the shape of the glass.
Image: chinadaily.com.cn
Of course, today we have the advantages of blowtorches, lathes, and other modern tools to aid this free flight technique.
Lathe spun against hand-spun glass
While a lot of glass is made using the hand-spun method, turning on lathes has become common, especially for larger pieces and large manufacturers. The rotational speed control provided by the lathe helps keep the hold and the sharp lines even. That and the thick glass with balanced bases are some of the main features of rotating glass.
A good lathe can cost many thousands of dollars to buy and use a good amount of power. In addition to the high acquisition costs and the high price, running a lathe takes up additional space in a glass blowing studio. All of this adds to overhead costs, which is often reflected in the price of well-made, twisted glass.
Handspun glass is cheaper than working with a lathe, which is why handspun glassmakers are more common.
The hand-spun glass tends to have a simpler diffusion than the intricate percolators found on many scientific glass bongs made from lathe machines.
Handspun glass tends to have more rounded angles, and the pieces are often smaller and may not always be perfectly straight. However, this inconsistency in shape makes each piece unique, which itself can be desirable. Good artists can hand-spin some beautiful-looking pieces, which can fetch high prices, and this more artisanal approach can result in a stunning, rare, heady glass.
How to make a beaker bong
While much of the glass made by Fifth Ave Green House is relatively complex with percolators and recyclers for the sake of simplicity, in this article we will describe how we make the straight necked tumbler bongs that take the shape of an Erlenmeyer flask.
Instead of starting this process with a molten glass ball, we start this process with a cylindrical tube made of high quality borosilicate glass.
The glassblower scratches the borosilicate glass tube and adds some water to the scratched mark. Then they heat a glass rod until the end is glowing and melted. Finally, the glassblower pushes the hot rod to the end of the notch. The resulting heat transfer expands along the notch, effectively dividing the tube in two.
Bring the mouthpiece to the end
The bong maker mounts the pipe in a lathe to make sure it heats evenly and maintains an even shape.
As the glass rotates, a large bunsen burner heats the glass evenly. As the end of the glass gets hotter, the bong maker moves the bunsen burner further away from the working end so that it sits between the cooler end of the glass in the lathe handle and the working end.
This heat in the middle of the tube reduces the temperature difference and minimizes stress on the glass during processing.
Shape the mouthpiece
With a focused incandescent flame, the end of the tube is heated by the glass worker until it is red hot. You’re going to make a pearl lip out of this, the mouthpiece on top of the cup bong. Next, use a graphite rod to gently press against the hot end of the glass. As the tube rotates, the graphite pressing against it shapes the bead end evenly, helping to turn the end of the glass tube into a thick ring.
Since the glass is supposed to be the same diameter, the glass worker uses a graphite rod on the flat end of the glass as well as inside and outside the glass. You press lightly on it to shape and build the glass bead ring.
After the mouthpiece ends, the glassworker exits the pipe to cool down before swirling it around the ledge so he can make the bottom out of it.
Make the end of the cup
The glass is measured and marked where the neck should begin. This marked work area should be well spaced from the lathe’s metal chucks to allow enough space to work without heating the metal chucks, which would put pressure on the glass and possibly crack it.
Both pipe ends are in parts of the lathe. The tailstock is needed to support the lower end of the glass tube. The area in the middle should create the Erlenmeyer flask shape.
The glassblower places a rubber stopper at each end of the glass tube. The mouthpiece plug has a hole into which you insert an air tube. This air tube allows you to blow air into the glass to shape it later.
Cup end
While the lathe is turning, the glassblower heats the work area evenly with a bunsen burner and a flashlight. Then when they inflate an area they move the flame away and notch the tailstock a little. Pulling the tailstock will maintain the thickness of the glass as the air blown into the tube pushes the sides outward.
Then they reapply the heat around the bladder, making sure it stays hot and shipable to where the bladder is supposed to grow. When the glass blower blows air into the glass, they move again in the tailstock of the lathe.
By repeating this process, the glassblower can shape the bubble that forms in the glass tube.
After the Erlenmeyer flask is the correct size, you can concentrate the heat on the lower edge of this bubble, where you want to remove the excess tube.
Using the same graphite tube as before and a focused annealed flame, the glassblower overheats the glass tube below the bulb shape and works it into a flat bottom. The tailstock is slowly notched away, pulling the excess glass tube with it.
With a glass rod you can peel off excess glass at the bottom of the bong, and the small bump where the excess pipe was pulled away can be smoothed out with a little focused heat. By constantly applying a wide flame and a large paddle to the bottom of the glass, the glassblower can now flatten the base of the bong so that it sits nicely flat and does not tip over when you get up. They then place the glass on a hot marvering pad (a graphite or steel plate) to test that the floor is level before placing it in a furnace to anneal glass called a teaching.
Adding the joint to the bong
After the glass joint has been measured at an angle of approximately 45 degrees and compared to the downstream length, the glass worker can use a wet saw to cut the joint. After cutting, you can clean the joint and wash away chips or glass shavings.
The wet saw left a rough surface on the glass tube, so the glass worker has to heat the rough edge of the connecting tube and pick it out with a glass rod. This allows them to make a smooth seal when the joint is attached to the side of the piston.
The glassblower heats a point on the flask with a focused torch to which the compound is attached. When the correct area is glowing hot, you can blow into the bong, causing the heated area to bubble out. The glassblower can open this with a glass rod and fold back the edges, creating a hole in the side of the bulb.
In order to create the seal, the connection and the opening in the piston must be red-hot. Then the glassblower can work the joint to make sure it is at the right angle for the downstream area to get into the beaker and sit well below the water level. Once you have attached and sealed the hinge, put the bong back into the teaching.
This article focused on making a cup bong, but we hope it has also given you some insight into glass blowing and the skills glass blowers need.
Apart from the straight pipe bong, the beaker bong is one of the simpler water pipes. However, the skill and time required to create some of the more complex bongs and swabs, with their intricate tubes and artistic, colorful designs, is considerable. At Fifth Ave Green House we are fortunate that over 300 skilled craftsmen make all of our glass pipes, bongs and swab systems in-house. We hope you enjoy using these hookahs as much as we design and make them for you.
Post a comment: