
Which is the best DIY pipe?
We live in the golden age of weed paraphernalia. When it comes to how we consume our cannabis, we’ve never had as many options as we have now. Ultra-luxurious designer glass? For sure. Terpened Corn Husk Crutches? Yup. And what if you want to make your own bong from a McDonald’s takeout? You can do that too – I’m serious. Even cigarette papers got a huge sheen (someone 24K gold?).
Despite the overwhelming number of products you can use to consume cannabis, sometimes there is no other choice. Sometimes you’re stuck between a nug and a tough place. Most cannabis lovers have been there: when all you have is a flower without a pipe or even a single rolling paper.
Then even the most organized, best-cared for, and most experienced cannabis smoker needs a MacGyver supply – something that can be quickly and easily thrown together from common household items. And even if you’re not reduced to mere necessity, some of these DIY pieces are just fun to try at home or at a gathering.
Below, I share my shakedown on some of the most popular DIY pipes on the market. My criteria for judging one pipe against another were simple: component accessibility, ease of construction and smokability.
From worst to best, that’s how the battle of the DIY pipes played out.
The worst: the feather whistle
The pen whistle ranked last in DIY whistles in my opinion, but that doesn’t make anything bad. This pipe is by far the easiest to construct. It would take you literally 30 seconds to set up and maybe just a bit longer if like me you had to use a retractable pen that is harder to take apart.
You need a pen with a removable metal screw tip. The main disadvantage of this pen whistle is that you need to have the right type of pen, not every pen will do. Not that you need an overly complicated or expensive pen, mind you. What you will need, however, is a screw-tipped metal pin that can be removed as this metal tip is turned upside down and used as a bowl. Plastic won’t work here folks. Important points were lost as I suspect other people will have difficulty finding this type of pen if they don’t already have one.
How to assemble a pen whistle
Steps to assemble a pen whistle:
- Unscrew the metal tip and take the pen apart. This usually involves peeling off the back end and removing the ink cartridge and other moving parts. You should have an empty tube and a metal tip.
- Turn the tip over and clamp it back into the tube.
What you have now is essentially a one-hitter. Simple construction: Pretty simple.
Smokability: Just what you’d expect from any one-hitter: it’s a quick unfiltered hit. Not bad, but it’s only marginally better than the soda pipe when compared to others on this list as there are potential toxicity issues with this one.
The best in an emergency: the soda can pipe
The beverage can whistle could prove to be an absolute lifesaver. If you are a sophisticated person who has managed to rid your life of aluminum cans then I applaud you. However, many of us will have a soda can floating around at any time, and those cans can be made into a workable pipe in the blink of an eye and with limited supplies.
If you plan to use a pop can as a pipe, be aware that this type of material can be toxic when smoked and should be approached with caution.
How to assemble a soda can whistle
You need to start with a clean, empty beverage can and a pin or other needle:
- Remove the tab from the can mouth hole.
- Make an indentation in the center of the can with your thumb to form the “bowl”. (You don’t have to make too much of a fuss with this indent, but I spent a little time on it and shaped a pretty nice bowl.)
- Use a thumbtack or other needle-like tool to poke holes in the bowl.
- Next, make a carburetor hole on the left side of the can (or the right side if that’s what you prefer) and voila, a rudimentary pipe is born.
Smokability: Just like many other simple pipes out there. Even so, I would advise against using this pipe regularly. Most cans have chemical coatings on the inside and logos printed on the outside, which means they are used sparingly.
Gina Coleman / Weedmaps
Most convenient: the apple pipe
Ah, the apple pipe. What cannabis enthusiast hasn’t tried their hand at this classic DIY pipe yet? It’s simple, all natural, and chances are you have an apple somewhere. The apple pipe is just as easy to construct as the lemonade pipe, but the fact that it is likely to be pollutant-free – especially if you choose organic – makes it push the soda can in second place.
How to assemble an apple pipe
You will need an apple, a clean screwdriver, and a pin or other sharp, thin tool:
- Clean the stem so the natural indentation can serve as a bowl.
- Next, use a screwdriver (an extra long necked Philipps is what I used) to drill a carburetor hole into the core from the side of the apple.
- Poke a few holes with a needle or other sharp, thin tool that goes through the bowl to the carburetor hole. Test the suction and add more bowl holes as needed.
- Charge the bowl and hit it.
Smokability: Fine, but it can be more difficult to get good suction than the soda. It is really that easy.
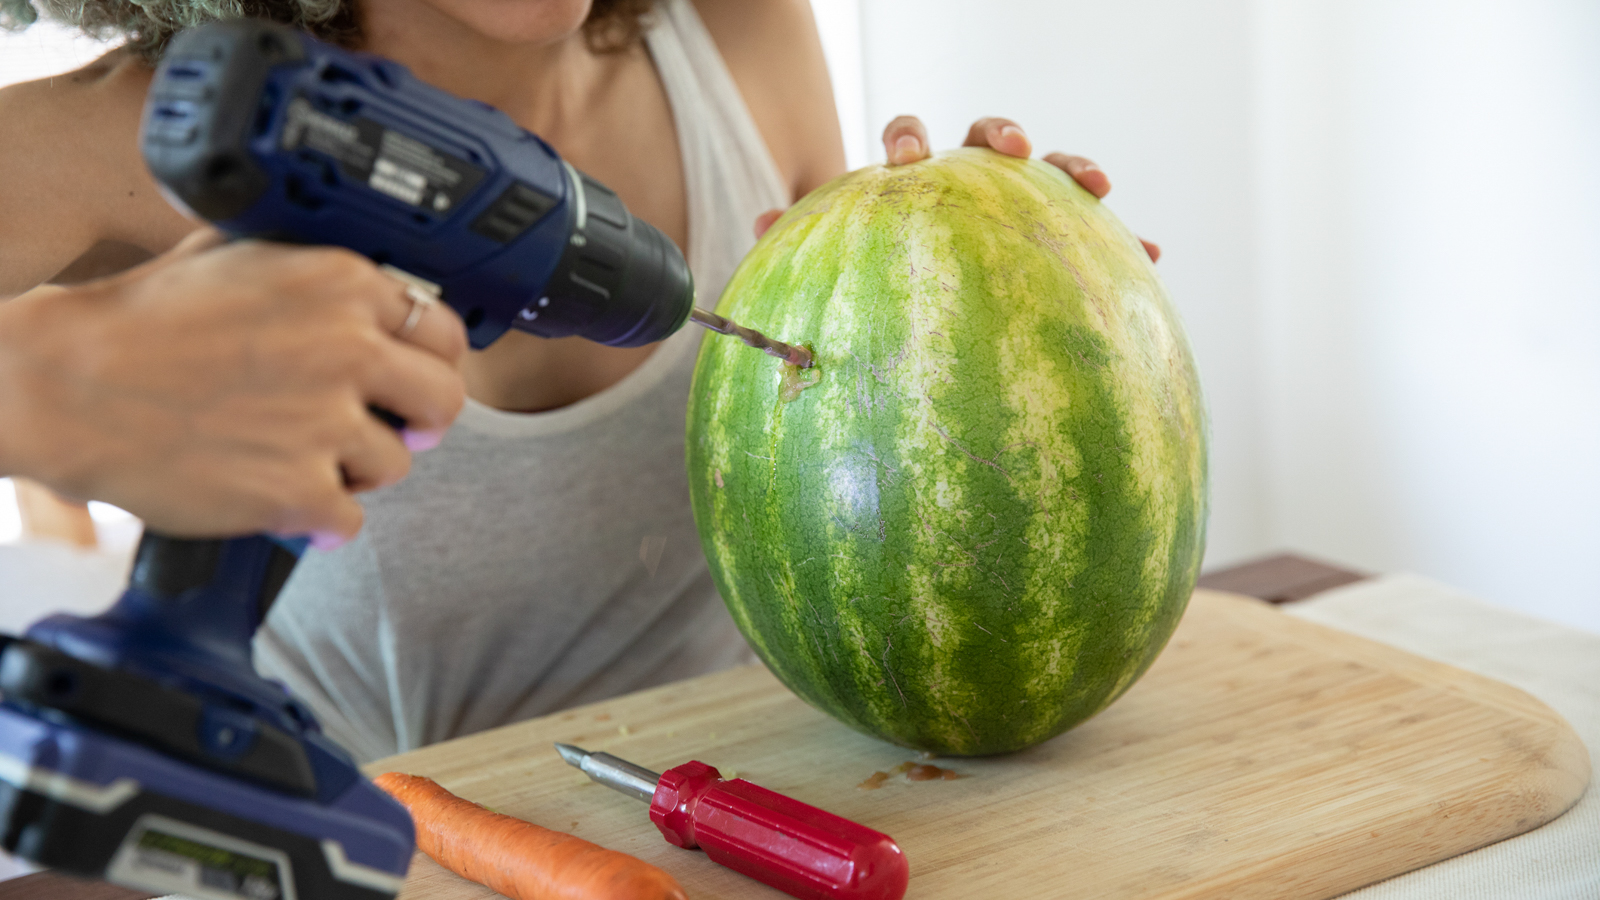
The best: the watermelon pipe
The watermelon pipe is the best pipe because although you may not always have a watermelon on hand, you can enjoy smoking weed from a watermelon and the novelty of it alone made me smile. In addition, at first sight, I was afraid that the watermelon pipe would be difficult to build. No, it was pretty easy.
This one requires a little more manual labor than the others, but all in all, it took less than 10 minutes to make and made for a whole evening of watermelon fun. I followed Weedmaps’ own directions, but I had no practice. The good news is you don’t need one. The extra long neck Phillips screwdriver I mentioned for the apple cane was perfect.
How to assemble a watermelon pipe
You will need a watermelon (a mini is recommended), a paring knife, drill or extra long-necked screwdriver and a large carrot.
- Make three holes in your melon: one on top for the mouthpiece and two on either side for the bowl and the carburetor hole. Make sure to connect these three holes to the same spot in the middle of the watermelon and rotate your tool in that middle to create a chamber of watermelon pulp / juice. (If we’re technical, it’s more of a bong than a pipe.)
- Use the long neck screwdriver or drill bit to create a hollow tube that runs the length of the carrot.
- Carve a bowl into one end of the carrot, insert it into one of the side holes, and you’re done.
Smokability: Smooth and, dare I say, delightful? Where this DIY bong loses points in terms of accessibility, it makes up for in novelty. Since it’s summer and we’re starting to gather again, why not destroy this watermelon bong at your next meeting of fully vaccinated people? I highly recommend it.
Featured image by Gina Coleman / Weedmaps
Post a comment: