
How to make a homemade dab rig?
One of the biggest trends in cannabis right now is dabbing.
Dabbing is an effective method of vaporizing and consuming various cannabis concentrates and requires a special device called a dab rig.
A homemade Dab Rig can be a fun project or a way to consume concentrates without breaking the bank.
Below we'll cover some dabbing basics and explain how to make your own dab rig and convert a mason jar into a dab rig.
What is a dab rig?
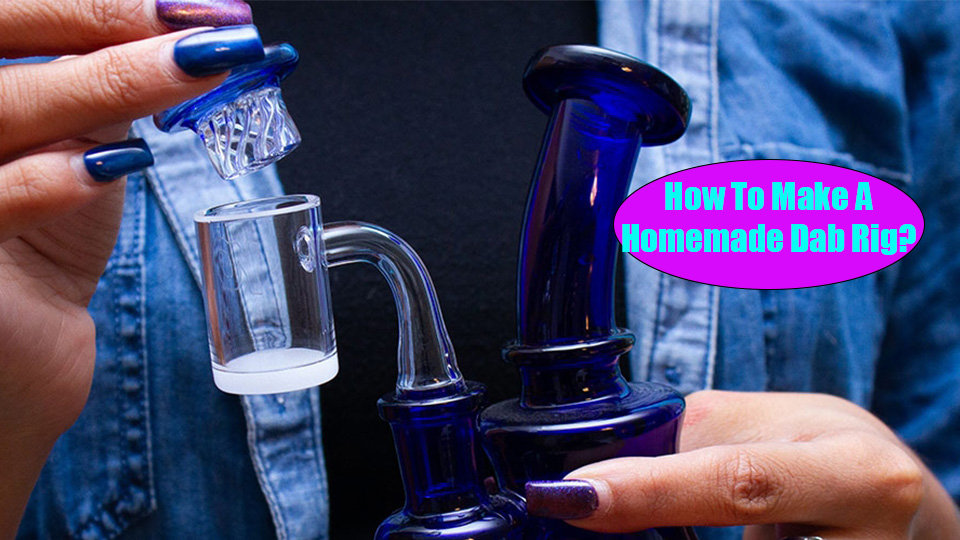
A dab rig, also known as an oil rig or concentrate pipe, is used to vaporize concentrated cannabis.
A dab rig requires a banger, not a bowl for marijuana flowers.
The nails are first heated with a spray gun and then the marijuana concentrate is added to the banger.
Dab Rigs vs Bongs
Although the Dab Rig was introduced later than the Bongit has become a popular staple in cannabis culture.
Dab rigs are more compact than bongs and the small chamber design helps the vapor reach the lungs quickly, improving flavor and reducing inhalation resistance.
Another distinguishing feature is that the dab rig typically uses a 10–14mm female mouthpiece, while most bongs use a 14–18mm male mouthpiece.
The downstem of a dab rig is usually straight and has a 90-degree angle, while the downstem of a bong is more of a 45-degree angle, which further differentiates the two.
The advantages of homemade dab rigs
Some people like to dab from a small piece of glass, while others prefer a larger, more elaborate setup.
Some prefer the simplicity of a simple banger and downstem combination, while others prefer to use accessories like slides and ash catchers.
Regardless of what type of dab rig you are looking for, there are many benefits to making your own:
- You can customize the design and size of your dab rig to suit your needs.
- You can use any type of glass or silicone bong or dab rig that works best for you without having to buy a new one (or as often).
- You can create a dab rig that is unique in its size, shape, color scheme, or all three!
How to make a dab rig with a mason jar?
This homemade dab rig is very effective and ideal for use when conventional equipment is damaged.
The glass material gives it excellent heat resistance and safety, and it is far more cost-effective than replacing the entire unit.
You will need the following:
- Glass jar with lid (medium)
- Use a drill to drill holes in the lid
- Pen with ink and tip removed
- Straw (metal is best, but flexible plastic straws work too
- Aluminium foil
- Nail dab
Once you have these items on hand, follow these steps:
Step 1: Mark the spot
Place the nail and straw on the lids of the jars and trace the outline with the marker.
Step 2: Drill holes
Use the drilling tool to drill two holes in the lid, depending on the size of the marked outline.
Step 3: Wrap the pen in aluminum foil.
Place the pin in one of the holes you drilled. This will be the downstem for the dab rig.
Step 4: Place the nail into the pen.
Secure the nail to the lid with more aluminum foil to ensure a good seal.
Step 5: Insert the flexible straw into the other hole.
Insert the straw into the other hole and secure it with foil to prevent air from escaping.
The straw should not touch the water in the can, so it can stick out a few centimeters.
Step 6: Fill the glass with water.
Fill your mason jar with water until the downstem is about 1/2″ underwater, then pat as normal. Breathe in through the straw.
How to make a dab rig with an old bong?
If you have a bong but no dab rig, try the following DIY dabbing method:
- Prepare two paper clips and a pair of needle-nose pliers.
- Bend one paper clip into a spiral and straighten the other.
- Clamp one end of the rolled up paper clip with the needle-nose pliers.
- Heat the rolled up paper clip with a soldering torch until it is hot enough.
- Dip the straightened paper clip into the marijuana concentrate.
- Gently push the paper clip dipped in concentrate against the heated paper clip spiral on the inside of the bowl and inhale the resulting smoke.
Be careful when handling to avoid burns.
In addition, the do-it-yourself method may solve the problem temporarily, but in the long run it may lead to the release of harmful substances.
That's why it's best to buy one Nail dab that matches the size of your bong bowl for a safer and more effective dabbing experience.
How to make a dab rig using a plastic bottle and a hot knife?
Although the hot knife method is effective, it carries risks and can cause scalding and be unsafe.
If you use this method, it is recommended that you switch to more secure devices as soon as possible.
Although it is a common do-it-yourself option when glass or fire is not available, smoking marijuana in a plastic bag for long periods of time can be harmful to your health.
What you need:
- Two butter knives
- Plastic water bottle, cut in half.
- Scissors
- Electric stove or burner
That's how it's done:
- Cut the water bottle in half and keep the part with the lid. Throw away the lid.
- Spread the marijuana concentrate evenly on a butter knife.
- Heat the knife with a torch or electric coils.
- Inhale the vapor that is released through the bottle opening as the concentrate and the heated blade fuse together.
Diploma
When using homemade marijuana smoking devices, safety is paramount, especially during the heating process.
Whether you're a newbie or an experienced marijuana user, it's important to understand the intricacies of choosing or making a dab.
For those who want to make a dab themselves, this guide provides a comprehensive guide to help you save money and do it safely using items you already have.
Post a comment: