
Making a glass pipe | Fifth Ave Green House
The hand whistles are the most popular entry-level piece for everyone. They’re retro, practical, easy to clean, and affordable; As for the basic smoking apparatus, they were almost done. Their simplicity makes it easy to overlook the question of how do we make them, but if you’re curious about something like this, the answer is more interesting than it looks.
It takes skilled glassblowers to make smooth, uniformly sized pipes with excellent airways for easy smoking. Sure, these pieces are easier to make than hookahs or heady glass rigs, but they still require attention to detail and a well-trained, steady hand.
There are many ways to make glass hand whistles, but here are some of the most popular.
Making hand pipes out of glass
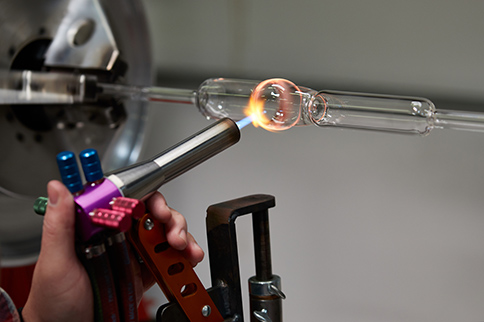
As with any other piece of glass we make, making a glass hand pipe starts with a thin glass tube. This glass tube is heated in the middle to form a round bulbous part about 3-4 inches (depending on the tube size you want), which is then squeezed in the middle.
The two parts are separated by heating and turning slightly so that they come apart and can be divided into two separate parts. This is a trick to save time and avoid glass waste.
Each piece is then sealed separately by heating and smoothing the end.
Some glassblowers may prefer to only make one bowl per tube as the extra glass on each end makes it easier to manipulate the glass, but since we make so many of them it is much more economical for Fifth Ave Green House’s glassmakers to do it that way do two at a time.
Glassblowers place the piece on a block that shapes the softened glass, which thins the part that separates the bowl from the stem.
In contrast to our scientific glass or Tataoo dab rigs from Fifth Ave Green House, the glass pipes or spoons are turned by hand and not on the lathe. It is this process that gives them their often more organic appearance.
Shape the pipe
Here the glassblower shapes the mouthpiece of the tube by blowing some air into the heated body, which causes the end of the bowl to expand and become more spherical. The glassblower must ensure that the glass rotates evenly. You need to keep the weight you entered to prevent the designs from becoming skewed or uneven in thickness.
Shape a bowl
The jar is placed flat on a table to make the bowl. The glassmaker uses a carbon stick to perform a “bowl push” which, as the name suggests, creates the arched space to place the herb that is smoked out of the pipe.
While the glass is still glowing hot, the glassmaker must quickly punch a hole in the bottom of the bowl with a sharp tool, which will open the path for the smoke to get to the mouthpiece end.
The glassmaker uses a flashlight to heat the outer part of the glass in which the bowl has just been made. Blowing in some air from the other end will expand this softer glass.
This can be opened into a hole that forms the carburetor of the bowl.
After that, the bottom of the bowl is flattened to ensure it doesn’t tip over when placed on a surface.
Shape the mouthpiece
The mouthpiece end of the glass needs to be heated and rotated to remove any bumps.
glow
Finally, the glass is annealed, which removes the thermal stresses created on the glass during glass blowing. Unannealed parts can break with changes in temperature – which isn’t a problem you would want heating a bowl right in front of your face.
Manufacture of decorative glass pipes.
The flare method
This process, while perhaps the most traditional, is not the only way to make glass tubing.
There’s also the inside-out flare method, a popular option for those who want to trace designs in the pipes and create the iconic swirled spoons that are so popular.
In this method, the bowl is made from the end of the glass tube, not in the middle, lit, and blown through the handle to create an open lightbulb. The glassblowers use straight tweezers called jacks to turn the parts as they straighten the wall of the lightbulb into a cylinder and eventually an enlarged funnel.
Precise flashlight
With a precise flame, the glassmaker can then use a stained glass stick to place details such as wavy lines in the bowl to give it additional character. The decorated bowl is heated, rolled back into a cylindrical shape on a flat plate, and then clamped with a jack until it returns to its original oval light bulb. With a blowpipe, the glassmaker shapes the pipe by heating the center, blowing it into the socket and twisting it so that it takes on the familiar spoon shape.
There are many other methods of decorating the pipe and creating exciting designs. Decorative tags can be added or colored by smoking.
Other design methods include dichro, striping, wrap and rakes, caning, latticino, latticello, reticella, or the use of millefiore or murrine techniques.
The last step
As with other spoon making methods, the glass maker then blows a glass handle into the end of the part until a ball is created that fits the bowl. The bowl is heated and pushed, which flattens the bottom of the tube and stamps the carbohydrates. The handle is removed, the bowl is glowed and voila! A decorative glass bowl was born.
Post a comment: